In this tutorial, we will be setting up a Solrcloud cluster on Amazon EC2.
We’ll be using Solr 8.6.2, Zookeeper 3.5.7 on Debian 10 instances.
This tutorial explains step by step how to reach this objective.
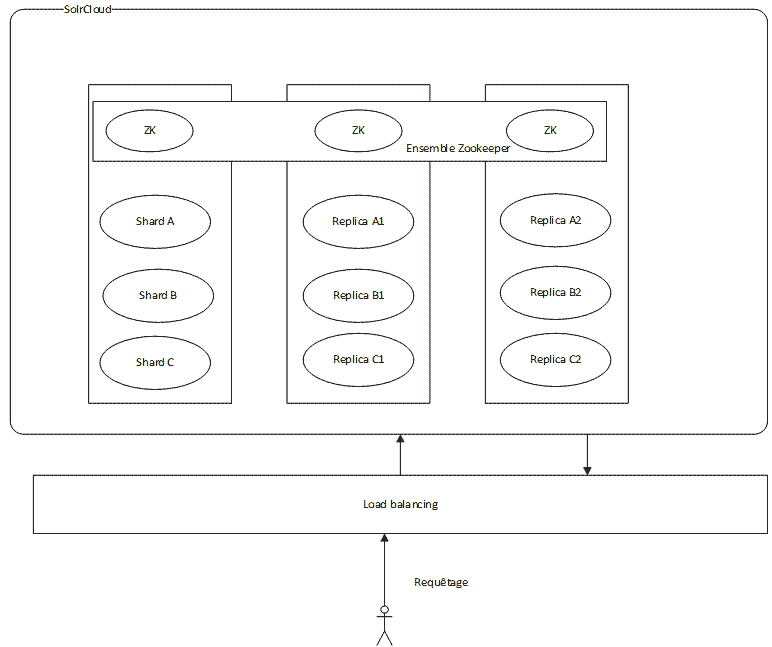
We will be installing a set of 3 machines, with 3 shards per server, which gives us a total of 9 shards. The replication factor is 3.
We will also be installing a Zookeeper ensemble of 3 machines.
This architecture will be flexible enough to allow for a fail-over of one or two machines, depending on whether we are at the indexing phase or at the querying phase:
- Indexing: a machine can fail without impacting the cluster (the zookeeper ensemble of 3 machines allows for one machine down). The updates are successfully broadcasted to the machines still running.
- Querying: two machines can fail without impacting the cluster. Since each machine hosts 3 shards, a search query can be processed without problems, the only constraints being a slower response time due to the higher load on the remaining machine.
Here is the architecture of what we want to achieve :
To achieve this, we will be using Amazon EC2 instances.
The steps are:
- Configuration of the EC2 instances
- Installation of the software components
- Configuration of Solr Home
- Configuration of Zookeeper
- Configuration of Solrcloud
Configuration of EC2 instances:
In this tutorial, the chosen instances are of type m3 medium with the following specs :
t2.medium : 2vcpu 4 Go RAM
This will be more than enough for our tutorial.
Once connected to AWS, go to the EC2 page and create 3 instances of type t2.medium. Chose the Debian10 image (Buster) 64 bits, which is available for free on the AWS Store.
Create or use a security key common to the 3 instances.
Once started, you should have the following 3 AWS instances, named respectively solr1, solr2 and solr3 :

You need to set the group security associated to the instances so that the instances can communicate with each other, and so that we can access to the Jetty from outside.
The rules to be added are (in addition of the SSH connection):
Solr: TCP 8983
Zookeeper: TCP 2181, 2888, 3888
All traffic from other machines from same security group

We advise assigning « elastic ip » addresses to the instances, in order to connect to it using a fix public ip address.
Without elastic ip addresses, you would be forced to declare the private ip addresses of the instances within the Zookeeper (ZK) configuration, and these IPs change everytime you restart your machines, meaning you’d need to reconfigure your ZK after every restart. Using elastic ips, you benefit from the public dns which takes care of mapping the private ip addresses.
Once the instances are ready, we can connect to it.
For this, use either Putty on Windows, or the terminal on Linux/Mac OS X, with the security key bound to the instances.
In this tutorial, we’ll be using iTerm on macOs. You can also try for example EC2Box (http://ec2box.com) which can easily send grouped commands to several EC2 instances.
To establish the SSH connection with the EC2 instances, you can find some help here : http://docs.aws.amazon.com/AWSEC2/latest/UserGuide/AccessingInstancesLinux.html
Basically you need to change the permission on the private key you associated to your instances :
chmod 400 **/path/private/key/*.pemAnd the SSH command connection is :
ssh -i **/path/private/key/*.pem admin@ELASTIC_IP
So for our instances the commands will be :
ssh -i /Users/olivier/Documents/code/Olivkeys.pem admin@15.237.35.26

ssh -i /Users/olivier/Documents/code/Olivkeys.pem admin@15.237.67.168

ssh -i /Users/olivier/Documents/code/Olivkeys.pem admin@15.237.78.56
NB : if you did not take elastic IP, replace the IP by the public DNS of each instance : ec2-XX-XX-XX-XX.XXX.compute.amazonaws.com
Our instances are successfully created and we successfully connected to it, so now let’s do the real work!
For the rest of the tutorial, We change the user connected into root :
sudo -i
Installing Java and the software components:
We will start with installing Oracle Java JDK 11, then we’ll download the latest versions of Solr and Zookeeper.
Installing Java:
To quickly setup Java, we will install OpenJDK JDK11 :
apt-get update
apt-get install openjdk-11-jdk -y
Set the JAVA_HOME variable :
echo 'export JAVA_HOME=/usr/lib/jvm/java-11-openjdk' >> /etc/profile
Then to take into account the changes :
source /etc/profile
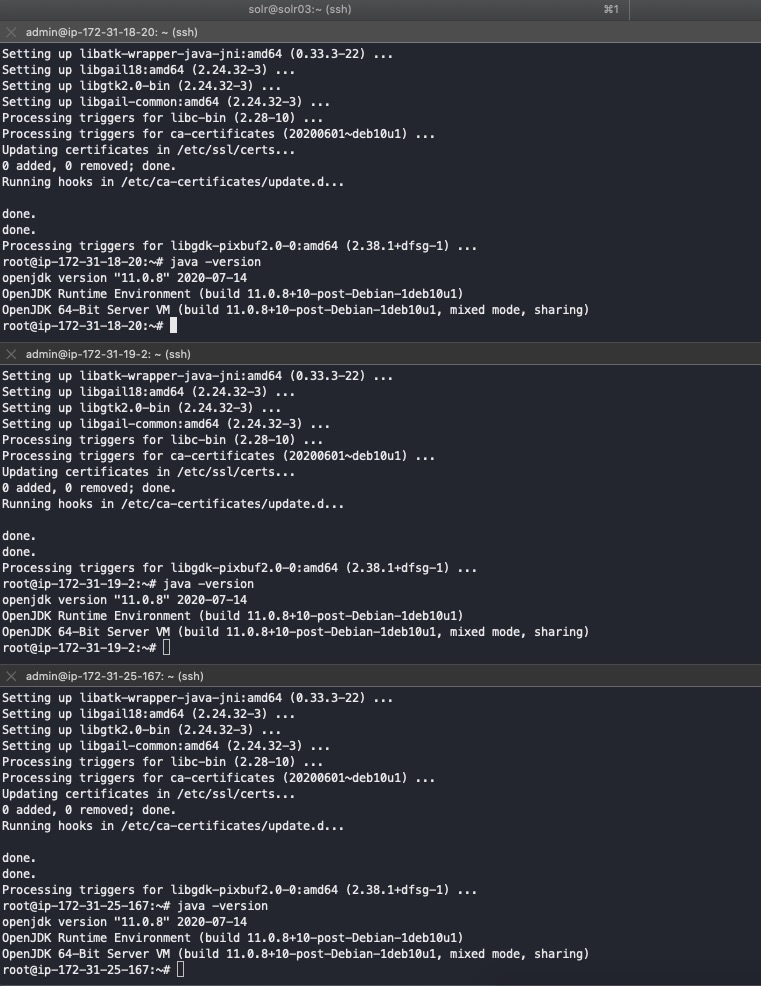
To check that Java is properly installed, enter :
java –version
And you should be getting :
openjdk version "11.0.8" 2020-07-14
OpenJDK Runtime Environment (build 11.0.8+10-post-Debian-1deb10u1)
OpenJDK 64-Bit Server VM (build 25.151-b12, mixed mode)
Installing the software components:
Go to /root :
cd /root
Download Solr :
http://lucene.apache.org/solr/downloads.html
We choose Solr 8.6.2 (.tgz)
wget https://downloads.apache.org/lucene/solr/8.6.2/solr-8.6.2.tgz
Download Zookeeper :
http://www.apache.org/dyn/closer.cgi/zookeeper/
Then choose Zookeeper 3.5.7 (tar.gz)
wget https://archive.apache.org/dist/zookeeper/zookeeper-3.5.7/apache-zookeeper-3.5.7-bin.tar.gz
Then unzip these archives :
tar xfvz solr*.tgz
tar xfvz apache-zookeeper-*.tar.gz
Solr is installed as a service using the provided script :
cd /root/solr-*/bin
./install_solr_service.sh /root/solr*.tgz -n
You can leave the default parameters of the script.
All the install files are in /opt/solr (do not modify them) and all the files to be modified are located in /var/solr (solr home, logs) and the primary configuration file : solr.in.sh in /etc/default/solr
Solr is installed by defaults in /opt/solr-8.x with a symbolic link towards /opt/solr.
Java is correctly installed, as well as all the software components required to configure our SolrCloud cluster.
Let’s move on to the configuration aspects !
Configuring Solr :
Let’s modify the solr.in.sh file located in /etc/default/solr by editing and uncommenting the ZK_HOST and the SOLR_HOST properties :
nano /etc/default/solr.in.sh ZK_HOST="ec2-52-28-143-201.eu-central-1.compute.amazonaws.com:2181,ec2-18-196-4-69.eu-central-1.compute.amazonaws.com:2181,ec2-18-195-201-156.eu-central-1.compute.amazonaws.com:2181" SOLR_HOST=ec2-52-28-143-201.eu-central-1.compute.amazonaws.com
(adapt the value of the SOLR_HOST for each server. You need to indicate the public IP of the server).
The RAM is also configured by default. To change these values, you need to modify SOLR_JAVA_MEM.
SOLR_JAVA_MEM="-Xms512m -Xmx512m"
The most important parameter is ZK_HOST where one needs to specify the IP addresses of our ZK ensemble. Solr will start automatically in solrcloud mode when this parameter is filled.
Configuring Zookeeper:
Move the zookeeper folder into /opt :
mv /root/apache-zookeeper-*-bin /opt/zookeeper
Go to /opt/zookeeper :
cd /opt/zookeeper
We will be creating the configuration that allows to setup a ZK ensemble made of 3 machines.
Create a folder allowing Zookeeper to place its data :
mkdir /opt/zookeeper/data
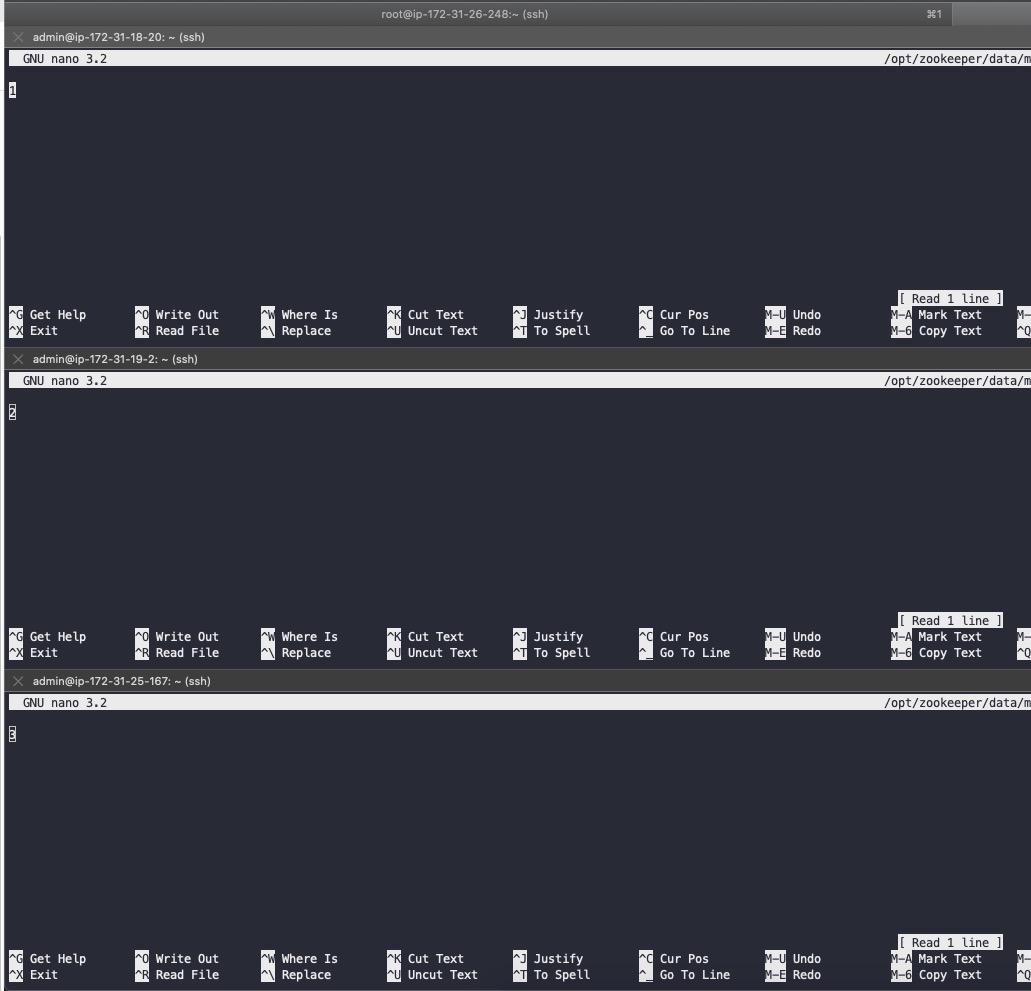
Inside it, create a file called myid :
nano /opt/zookeeper/tmp/myid
Change the value for each instance :
For solrcloud1, enter 1
For solrcloud2, enter 2
For solrcloud3, enter 3
Now let’s move on to the configuration per se, by creating the zoo.cfg file in /opt/zookeeper/conf :
nano /opt/zookeeper/conf/zoo.cfg
Now we are going to change the value of the property dataDir and add the DNS name of the servers of the cluster and finally activate the autopurge :
# The number of milliseconds of each tick
 tickTime=2000
 # The number of ticks that the initial
 # synchronization phase can take
 initLimit=10
 # The number of ticks that can pass between
 # sending a request and getting an acknowledgement
 syncLimit=5
 # the directory where the snapshot is stored.
 # do not use /tmp for storage, /tmp here is just
 # example sakes.
 dataDir=/opt/zookeeper/data
 # the port at which the clients will connect
 clientPort=2181
 # the maximum number of client connections.
 # increase this if you need to handle more clients
 #maxClientCnxns=60
 #
 # Be sure to read the maintenance section of the
 # administrator guide before turning on autopurge.
 #
 # http://zookeeper.apache.org/doc/current/zookeeperAdmin.html#sc_maintenance
 #
 # The number of snapshots to retain in dataDir
 #autopurge.snapRetainCount=3
 # Purge task interval in hours
 # Set to "0" to disable auto purge feature
 #autopurge.purgeInterval=1
 autopurge.snapRetainCount=3
 autopurge.purgeInterval=1
 server.1=ec2-15-237-35-26.eu-west-3.compute.amazonaws.com:2888:3888
 server.2=ec2-15-237-67-168.eu-west3.compute.amazonaws.com:2888:3888
 server.3=ec2-15-237-78-56.eu-west-3.compute.amazonaws.com:2888:3888
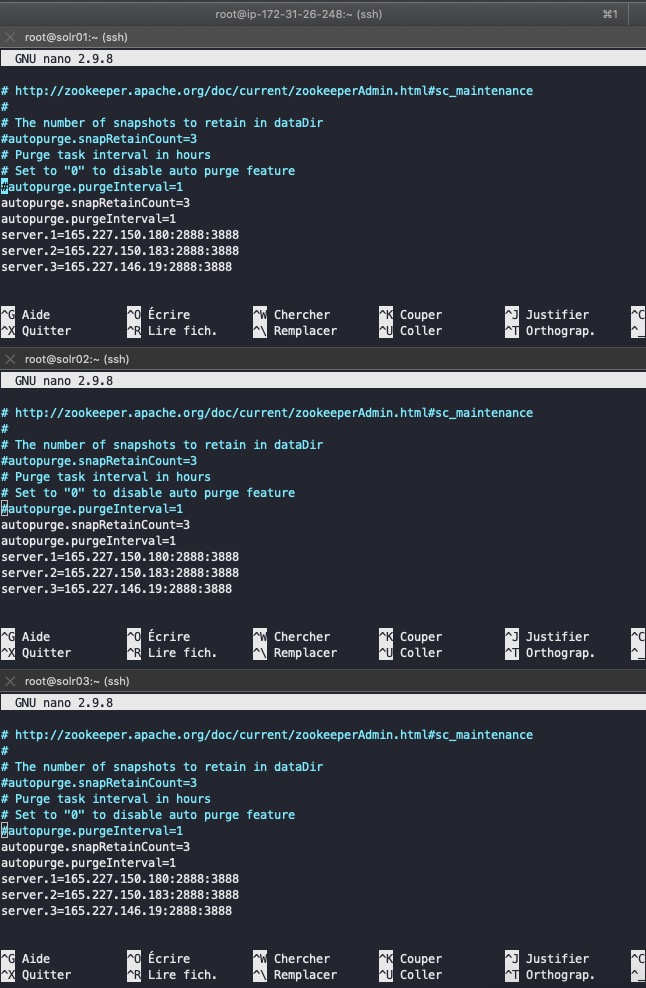
Hints :
- Take care not to put the public IP address, but rather the public DNS, otherwise the machines won’t be able to talk to each other.
To be sure, check upfront that they can ping each other - Also beware of the instances security group. Ensure that the ports that are necessary for communication between instances on Zookeeper are properly open (2181, 2888 et 3888)
Start ZK and Solr:
- Start ZK
Go to /opt/zookeeper/bin
cd /opt/zookeeper/bin
Then enter :
bash zkServer.sh start
You should obtain :
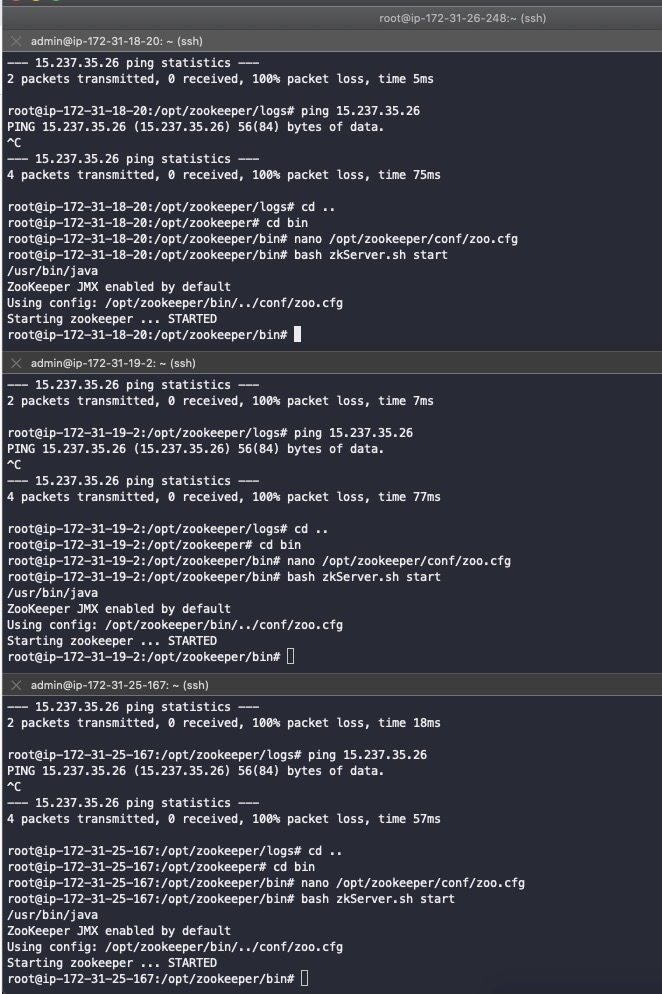
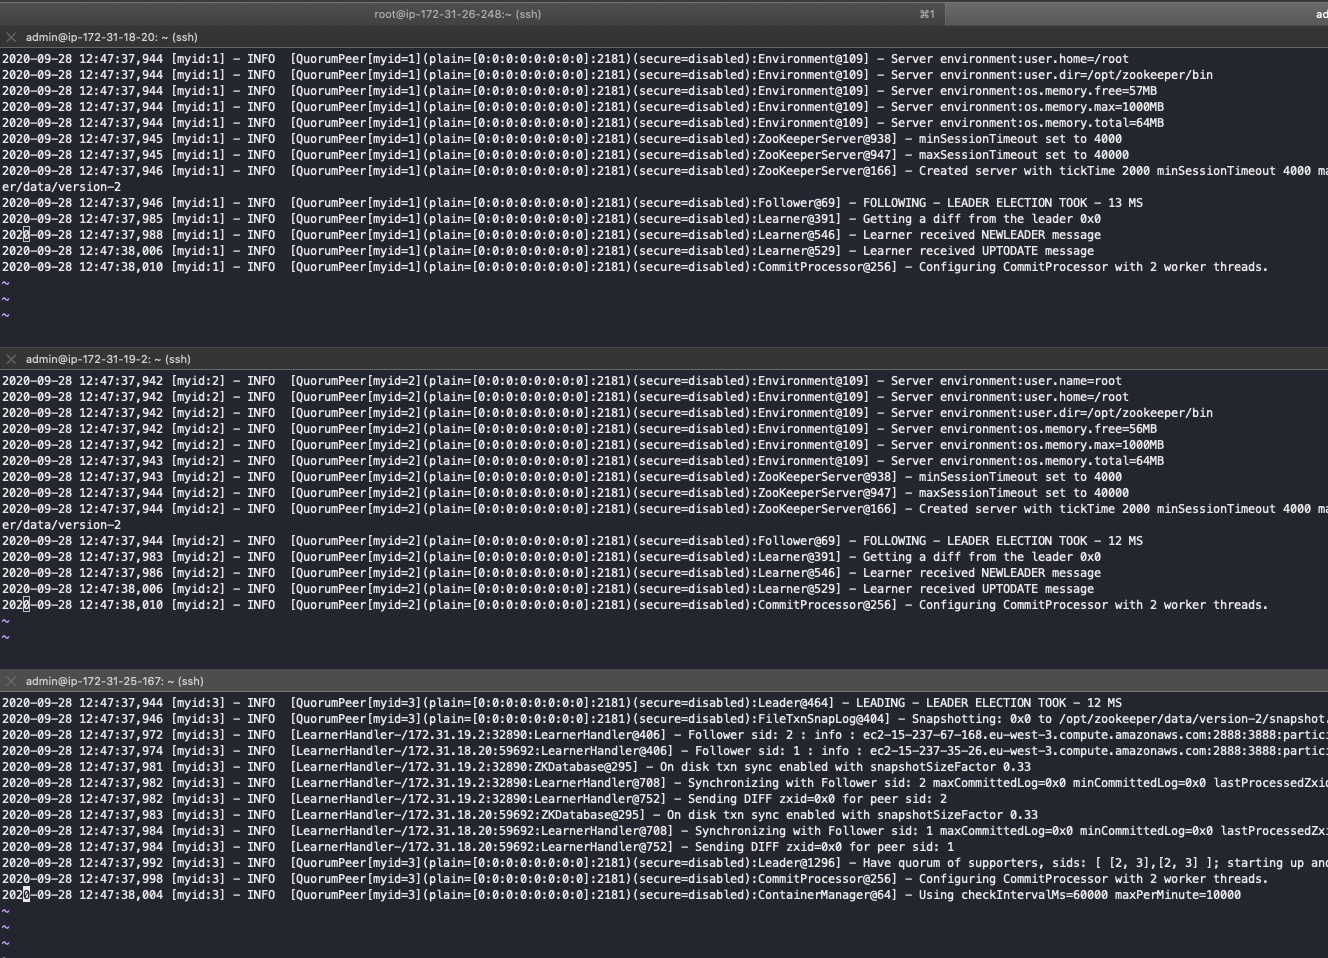
Open the ZK logs and check that everything is fine :
tail –f /opt/zookeeper/bin/zookeeper.*out
- Start Solr
Warning : Zookeeper MUST be started before Solr. Otherwise Solr cannot be launched into SolrCloud mode.
Launch directly the service :
service solr start
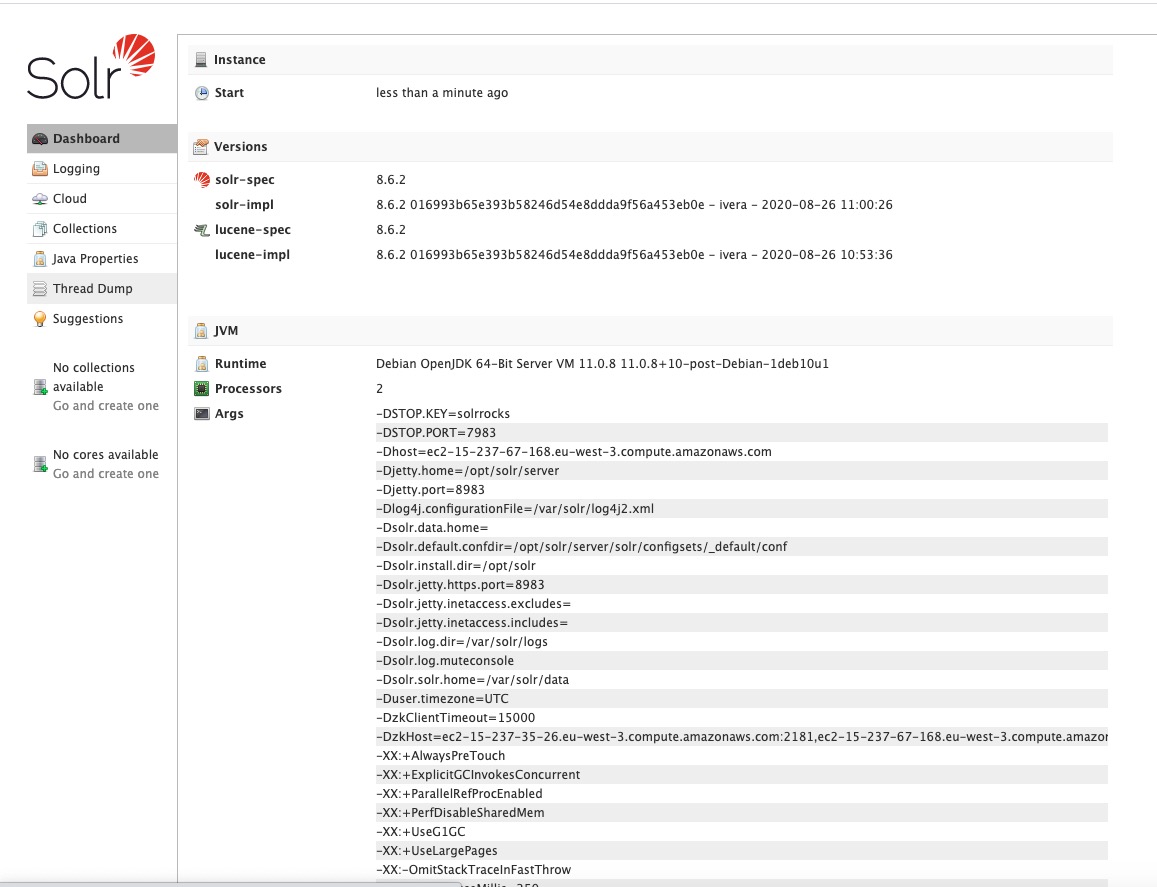
We can now connect to the web interface from any instance, and start configuring our SolrCloud cluster.
SolrCloud configuration:
To connect to the web interface, for instance solrcloud1 :
http://ec2-52-28-143-201.eu-central-1.compute.amazonaws.com:8983/solr
You should see a Cloud tab, which is a good sign !
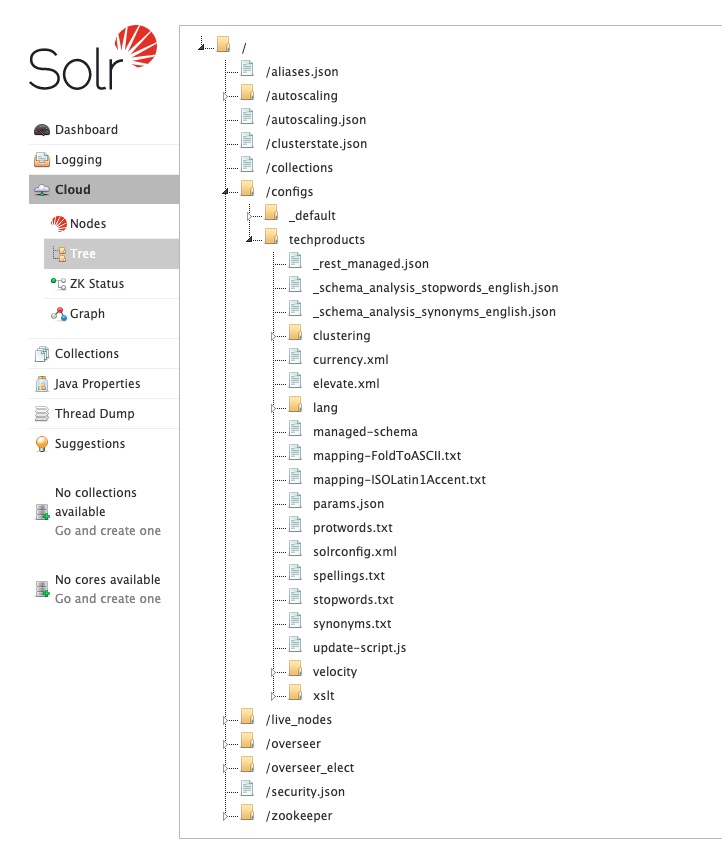
Click on this tab and you should get… an empty screen, which is normal since no collection has been configured yet. But if you click on the sub-tab Tree and adter on the folder live nodes, you should see the 3 server IPs.
So let’s add a collection made of 3 shards with 2 replicas each, on our ensemble of 3 instances.
To achieve this, let’s use the collections API of SolrCloud : https://cwiki.apache.org/confluence/display/solr/Collections+API
The syntax looks like this :
/admin/collections?action=CREATE&name=name&numShards=number&replicationFactor=number&maxShardsPerNode=number&createNodeSet=nodelist&collection.configName=configname
To do this, we first need a Solr configuration in Zookeeper (parameter collection.configName=configname).
We’ll be using here the Solr control script which is available in the Solr distro under bin to upload our Solr configuration towards ZK.
We will send to ZK a standard configuration that is present by default in the Solr distribution : techproducts (/opt/solr/server/solr/configsets/techproducts)
BEWARE ! From now on, the commands must be entered in only one instance, not simultaneously on the 3 instances anymore !
For this, go to/opt/solr/bin :
cd /opt/solr/bin
Then enter :
./solr zk upconfig -n techproducts -d ../server/solr/configsets/sample_techproducts_configs/
zkhost represents the ZK ensemble, -cmd upconfig represents the folder in which you’ll find the Solr configuration to be sent (here we use the default configuration provided with Solr) and last the name with which the configuration will be stored in ZK.
Hint: the sequence of the arguments in the command does matter
What’s left for us is to connect to the web interface to check if the configuration is present in ZK :
We can now create the collection on our 3 instances, let’s use the command mentionned above, which comes from the collections API :
/admin/collections?action=CREATE&name=name&numShards=number&replicationFactor=number&maxShardsPerNode=number&createNodeSet=nodelist&collection.configName=configname
Let’s adapt this commande for our case, and type it in in our web browser :
http://ec2-52-28-143-201.eu-central-1.compute.amazonaws.com:8983/solr/admin/collections?action=CREATE&name=francelabs&numShards=3&replicationFactor=3&collection.configName=techproducts&maxShardsPerNode=3
Some explanation about the parameters :
- ec2-52-28-143-201.eu-central-1.compute.amazonaws.com :8983 : the public ip address of the solrcloud1 instance, we could also have chosen the ones of solrcloud2 or solrcloud3, this doesn’t matter
- name = francelabs : the name of our collection
- numShards = 3 : the number of shards that will be sharing the Solr index
- replicationFactor = 3 : each shard is replicated 2 times (as a matter of fact, using a replication factor of 1 means that shard is alone)
- maxShardsPerNode : the maximum number of shards per instance: here we have 3 shards with a replication factor of 3 hence 3×3 = 9 shards in total. We have 3 machines hence 9 / 3 = 3 shards per node, so we set maxShardsPerNode to 3.
This command will take some time to complete. Once it is done, check the status of your cloud :
http://ec2-52-28-143-201.eu-central-1.compute.amazonaws.com:8983/solr/#/~cloud
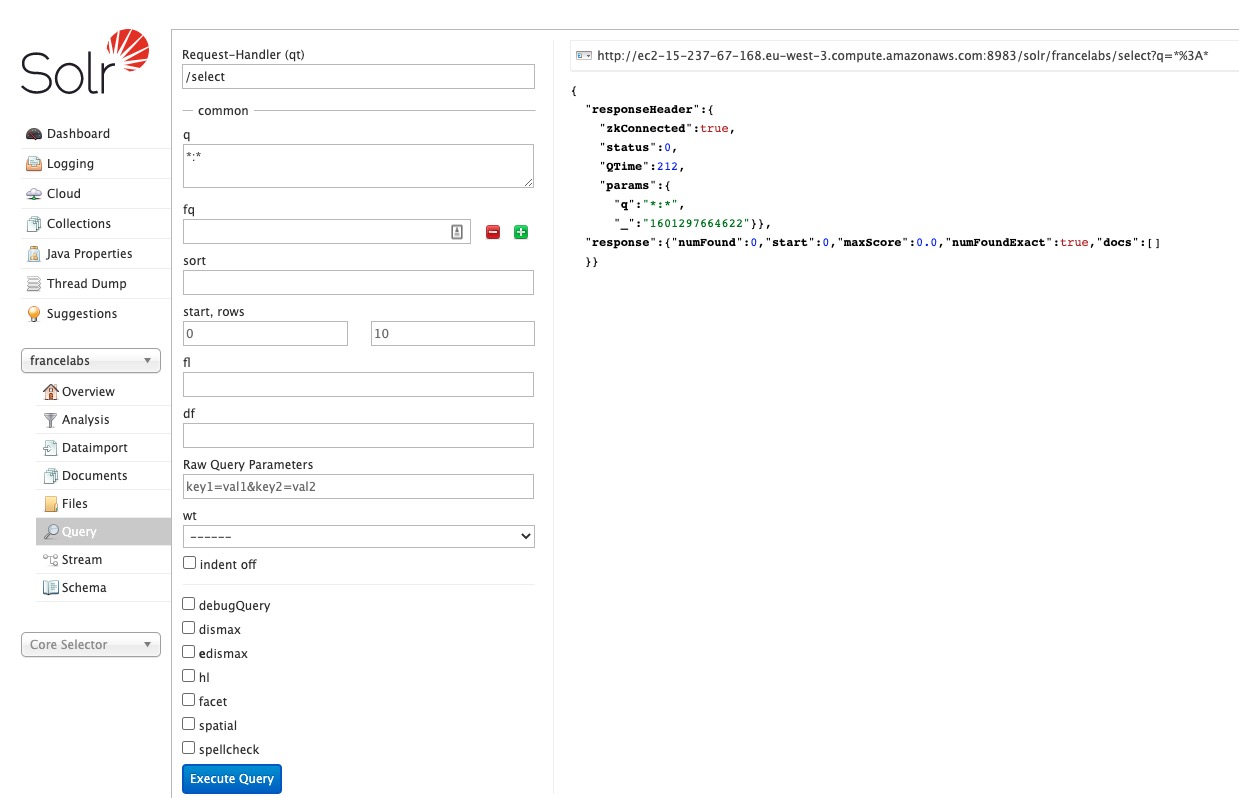
And if we want to see which files have been created (connect to any instance, here to solrcloud1) :
cd /var/solr/data
We have 3 created folders, each containing a part of the index :
The only folder is data, as the configuration of Solr is stored in Zookeeper.
And VOILA, you now have a fully functional Solrcloud system on Amazon EC2. We hope you enjoyed this blog post!