UPDATE: This tutorial is based on Solr 4. If you want to use Solr 8, we strongly recommend to use our recent blog entry to set up Solrcloud 8 on Amazon EC2
NOTE: There is French version to this tutorial, which you’ll find on the second half of this blog entry.
In this tutorial, we’ll be installing a SolrCloud cluster on Amazon EC2.
We’ll be using Solr 4.9, Tomcat 7 and Zookeeper 3.4.6 on Debian 7 instances.
This tutorial will explain how to achieve this result.
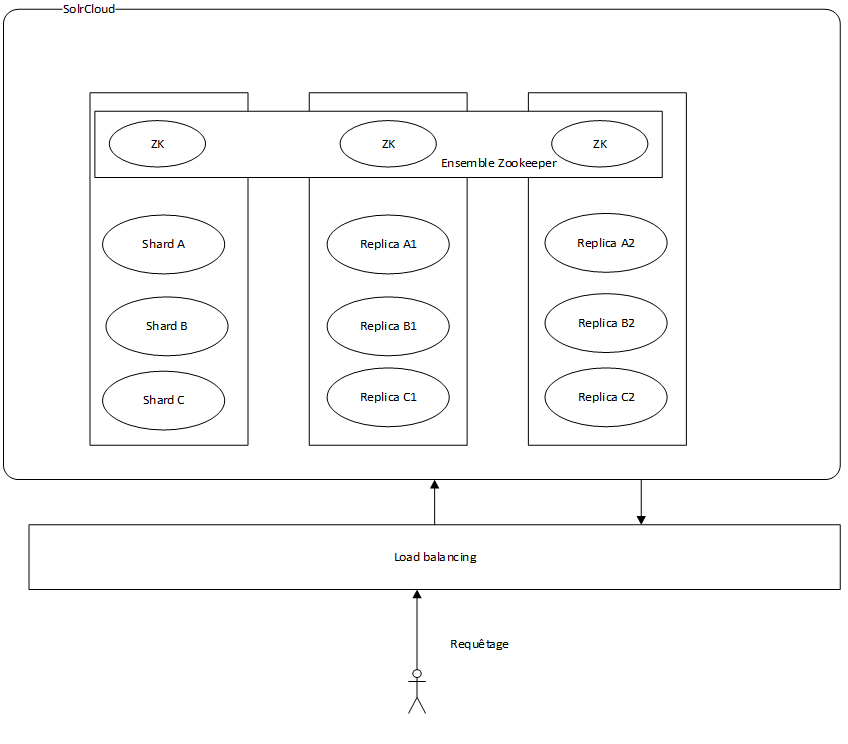
We’ll be installing a set of 3 machines with 3 shards and 2 replicas per shard, thus creating a set of 9 shards.
We’ll also be installing a Zookeeper ensemble of 3 machines.
This architecture will be flexible enough to allow for a fail-over of one or two machines, depending on the phase we’re at: indexing or querying.
- Indexing: a machine can fail without impacting the cluster (the zookeeper ensemble of 3 machines allows for one machine down). The updates will be broadcasted to the machines that are still up
- Querying : Two machines can fail without impacting the cluster. Each machine is hosting the 3 shards, thus the query can be done without problem, the only constraint is the potential slowdown on the query time.
Here is a schema of what we want to achieve:
To do that, we’ll be using Amazon EC2 instances.
The steps are:
- Configuration of the EC2 instances
- Installation of the required software
- Configuration of Solr Home
- Configuration of Tomcat
- Configuration of Zookeeper
- Configuration of Tomcat for SolrCloud
- Configuration of SolrCloud
Configuration des instances EC2:
For this tutorial, we chose m3 medium intsances, with the following specs:
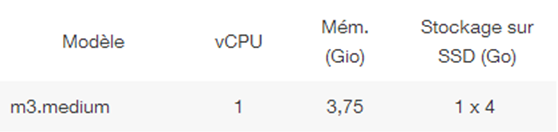
This will be largely enough in our case.
Once you’re connected to AWS, got to the EC2 page then create 3 instances of type m3 medium.
Select the Debian 7 64 bits image, which is available on the AWS Store (free) :
 Create or use a security key that will be shared among the 3 instances.
Once started, the 3 AWS instances are named solrcloud1, solrcloud2 et solrcloud3 :
![]() You need to set the security group associated to the instances, so that the instances can communicate with one another, and so that you can access to the Tomcat from the outside.
You need to set the security group associated to the instances, so that the instances can communicate with one another, and so that you can access to the Tomcat from the outside.
The rules that need to be added are (in addition to the SSH connection):
Tomcat : TCP 8080
Zookeeper : TCP 2181, 2888, 3888
 It is recommened to assign « elastic ip » to the instances, so that you can access them through a fixed public ip. This is the case in this screenshot.
In addition, it allows for having one public dns so that instances can communicate with each other.
Without « elastic ip », we would be forced to put the private ip addresses of the instances in the Zookeeper configuration (ZK), and these IP addresses are changing every time a machine is restarted. The public dns takes care of finding out the private IP address of the instance.
![]()
Once the instances are ready, we can connect to them.
For that, use Putty on Windows, or use the terminal on Linux/Mac OS X, using the security key associated to the instances.
In this tutorial, we’ll be using EC2Box that allows to easily send grouped commands to several EC2 instances.
For this purpose, download EC2box from its github :
We did this tutorial on Windows, and the version we installed is ec2box-jetty-v-0.15_00
Once installed, launch startEC2Box.bat.
Then, connect to https://localhost:8443/
By default, the login info are:
username:admin
password:changeme
Then go to Set AWS Credentials and type in the access key of the AWS user.
Then in Set EC2 Keys, type in the private key of the security key associated to the EC2 instances.
Last, go to Secure Shell -> Composite SSH Terms and select the 3 Solrcloud instances.
Select the admin user admin in order to connect.
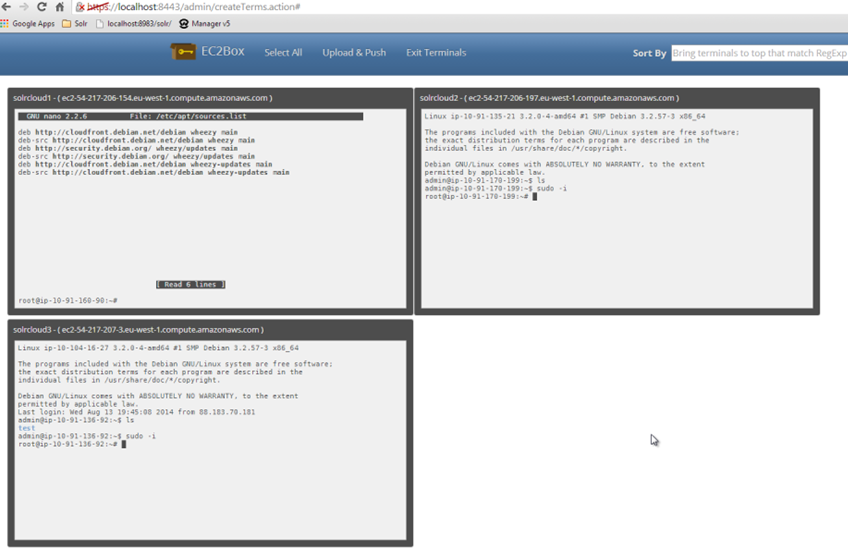
So that our commands can be sent simultaneously on the 3 instances, you need to click on each window or chose “select all” on top of the screen.
To be root :
sudo -i
Our instances have been created and we’ve been able to connect to it. Now we can start the configuration work !
Installing Java and the required software
We will start with the install of Oracle Java JDK 7, and we’ll then download the latest versions of Solr, Tomcat and Zookeeper.
Installing Java
To install Java quickly, we can use the repository hosted by webupd8team.
Here are the commands :
echo "deb http://ppa.launchpad.net/webupd8team/java/ubuntu precise main" | tee -a /etc/apt/sources.list echo "deb-src http://ppa.launchpad.net/webupd8team/java/ubuntu precise main" | tee -a /etc/apt/sources.list apt-key adv --keyserver hkp://keyserver.ubuntu.com:80 --recv-keys EEA14886 apt-get update apt-get install oracle-java7-installerAccept the Oracle licence terms and wait for the install to end.
To check that Java is correctly installed, enter:java –versionYou should get back:
java version "1.7.0_65" Java(TM) SE Runtime Environment (build 1.7.0_65-b17) Java HotSpot(TM) 64-Bit Server VM (build 24.65-b04, mixed mode)Installing the required software
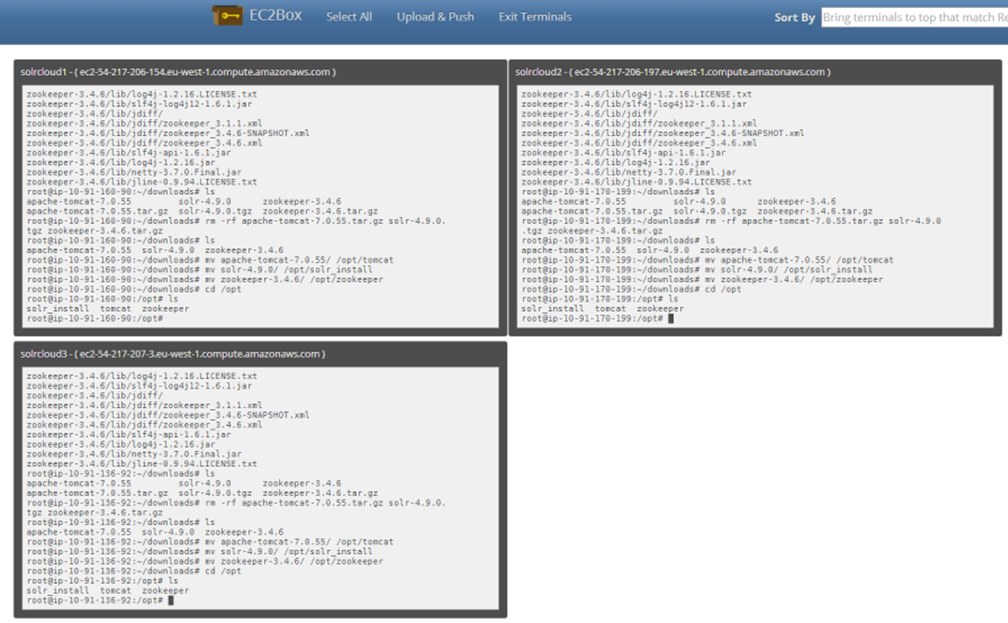
Create a downloads folder:
mkdir ~/downloads cd ~/downloadsDownload Tomcat :
wget http://mirror.bbln.org/apache/tomcat/tomcat-7/v7.0.55/bin/apache-tomcat-7.0.55.tar.gzDownload Solr :
wget http://wwwftp.ciril.fr/pub/apache/lucene/solr/4.9.0/solr-4.9.0.tgzDownload Zookeeper :
wget http://mirrors.ircam.fr/pub/apache/zookeeper/stable/zookeeper-3.4.6.tar.gzThen unzip each archives:
tar xfvz apache-tomcat-7.0.55.tar.gz tar xfvz solr-4.9.0.tgz tar xfvz zookeeper-3.4.6.tar.gzYou’ll then move the folders towards /opt :
mv apache-tomcat-7.0.55 /opt/tomcat mv solr-4.9.0 /opt/solr_install mv zookeeper-3.4.6 /opt/zookeeper
Java is now correctly installed as all the required software that are needed to correctly configure our SolrCloud cluster.
Let’s move on the Configuration part !Configuring Solr Home
Go to /opt to create a solr_home folder:
mkdir /opt/solr_homeWe will be copying into ti, the configuration files of collection1
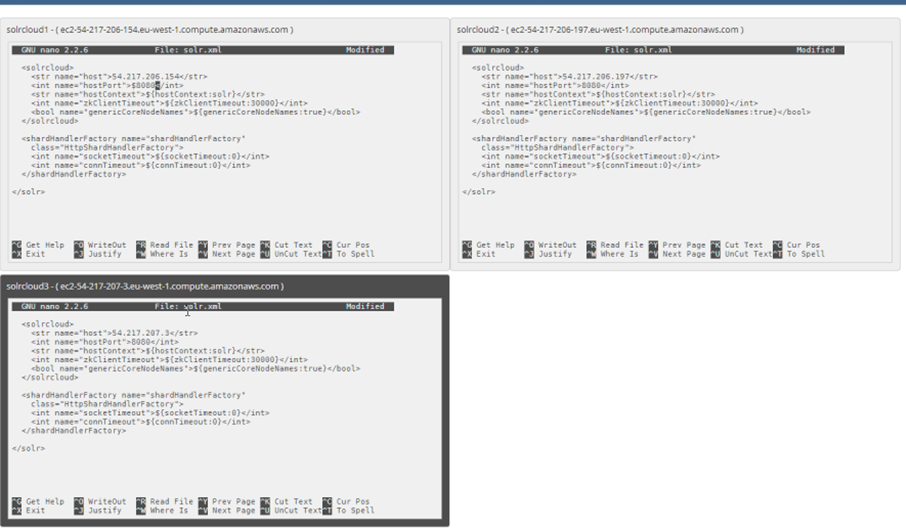
cd /opt cp –r solr_install/example/solr/* solr_home/cd /opt/solr_homeEdit the solr.xml file and replace the host with the public IP address of each EC2 instance.
Also replace the hostPort with 8080.
Delete collection1 that will not be used, since we’ll be sending to Zookeeper the Solr configuration to be used.
rm –rf collection1We now copy the Solr war in our solr_home:
mkdir /opt/solr_home/war cp /opt/solr_install/dist/solr-*.war /opt/solr_home/war/solr.war mv /opt/solr/war/solr-*.war solr.warOur solr_home is now configured.
Let’s move on to Tomcat.Configuration de Tomcat
cd /optWe first need to configure the Log4j logging framework for Tomcat.
cp –r solr_install/example/lib/ext/* tomcat/lib/ cp –r solr_install/example/resources/log4j.properties tomcat/lib/We now need to configure the context of Tomcat.
For this purpose, we need to launch Tomcat a first time, so that it can create the relevant files in /opt/tomcat/conf/Catalina.
Start Tomcat :/opt/tomcat/bin/startup.shThen, 10 secondes later, shutdown your Tomcat:
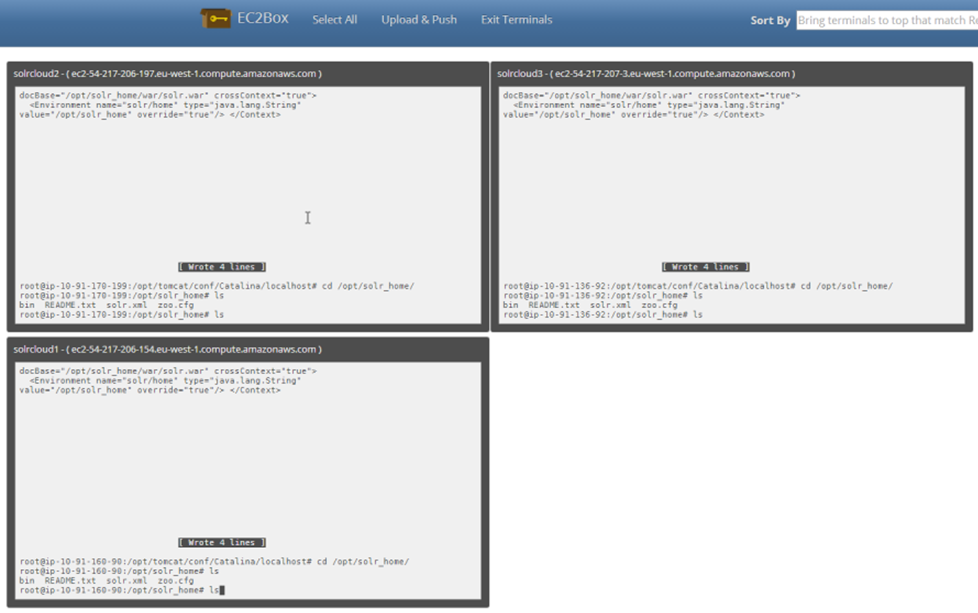
/opt/tomcat/bin/shutdown.shThen go to: /opt/tomcat/conf/Catalina/localhost and create the context for solr.xml :
cd /opt/tomcat/conf/Catalina/locahost nano solr.xmlThen copy the following configuration inside this file:
<?xml version="1.0" encoding="utf-8"?> <Context docBase="/opt/solr_home/war/solr.war" crossContext="true"> <Environment name="solr/home" type="java.lang.String" value="/opt/solr_home" override="true"/> </Context>
Tomcat is now configured. Let’s start it to check that everything’s fine:
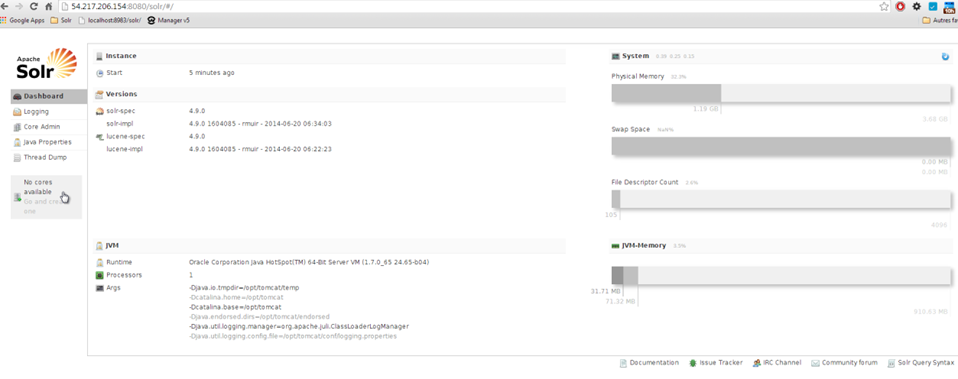
/opt/tomcat/bin/startup.shThen, use a web browser and connect to one of the public ip addresses of the EC2 instances. For instance in our case 54.217.206.154 :
http://54.217.206.154:8080/solr
Solr and Tomcat are now working.
You can read on the screen the following sentence: “no cores available”, which is normal since we have no collection currently configured in our solr_home.
You’ll also notice that there is no Cloud tab, which is also normal since we have not started Solr in its SolrCloud mode, but rather in its standalone mode. Indeed, we have not mentionned for now the use of Zookeeper for the configuration steps.It’s time to work on that!
Hint: is your Solr is unavailable, that may be du to the security group of the EC2 instance, which is being too restrictive. Check that port 8080 is accessible through TCP.
Configuring Zookeeper
Go to /opt/zookeeper:
cd /opt/zookeeperWe’ll now be creating the configuration that allows to create the ZK ensemble of 3 machines.
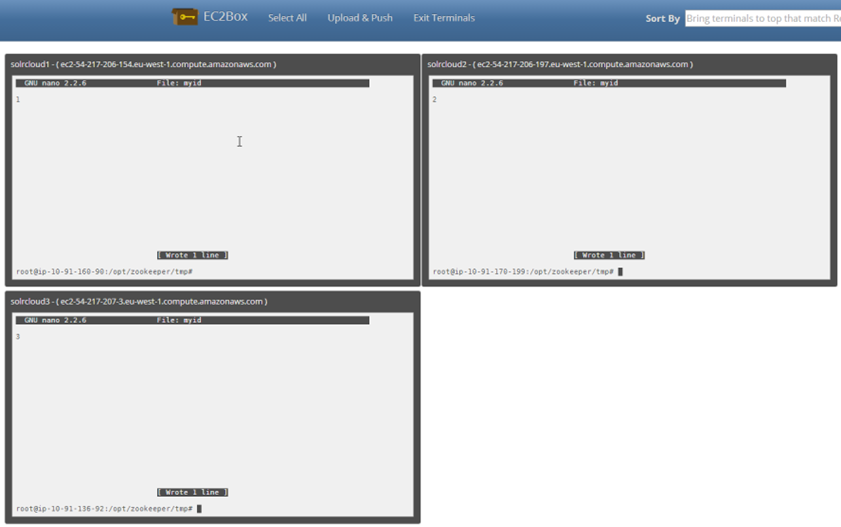
Create a folder where Zookeeper will put its data:mkdir /opt/zookeeper/tmpInside this folder, create a myid file:
nano /opt/zookeeper/tmp/myid
Change the value for each instance:
For solrcloud1, enter 1
For solrcloud2, enter 2
For solrcloud3, enter 3
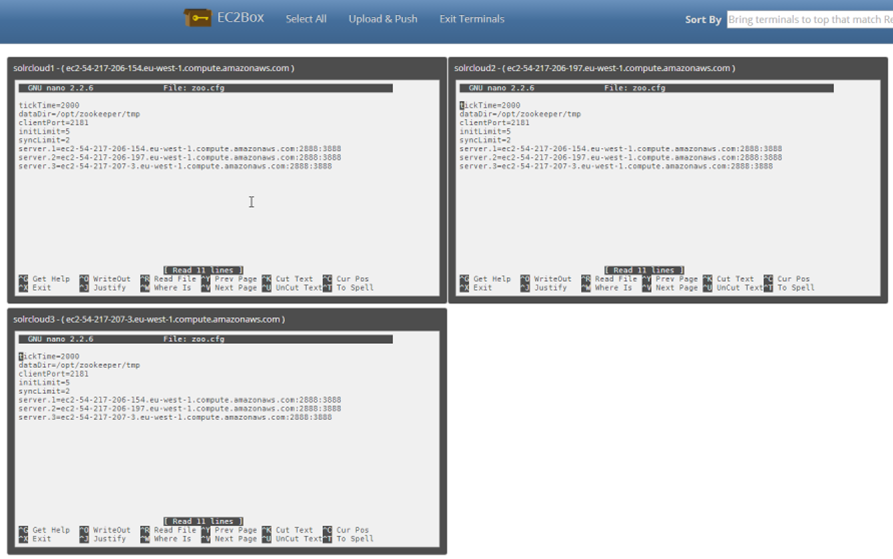
Let’s move on to the configuration per se, by creating the zoo.cfg file, in /opt/zookeeper/conf :
nano /opt/zookeeper/conf/zoo.cfgThen enter this configuration:
tickTime=2000 dataDir=/opt/zookeeper/tmp clientPort=2181 initLimit=5 syncLimit=2 server.1=ec2-54-217-206-154.eu-west-1.compute.amazonaws.com:2888:3888 server.2=ec2-54-217-206-197.eu-west-1.compute.amazonaws.com:2888:3888 server.3=ec2-54-217-207-3.eu-west-1.compute.amazonaws.com:2888:3888
Hint:
– Be careful to enter the public DNS, and NOT the public IP addresses, otherwise the machines won’t be able to communicate with each other.
You can check that beforehand by pinging them from one to the other
– Pay attention to the security group of the instances. Check that the ports required for communicataion of the instances on Zookeeper are declared as open (2181, 2888 et 3888)Start ZK :
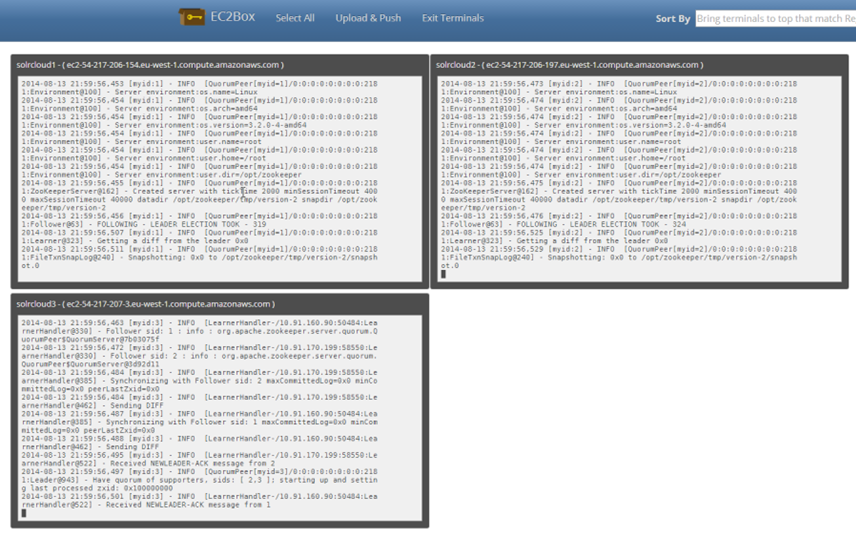
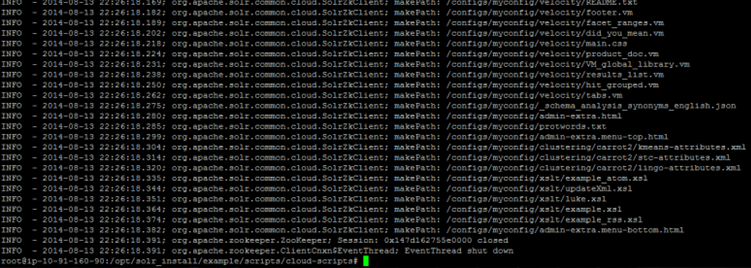
/opt/zookeeper/bin/zkServer.sh startCheck the zookeeper logs to see if everything’s fine:
tail –f /opt/zookeeper/zookeeper.out
You can see here that everything’s going as planned, as the leader has been elected.
Now that our Zookeeper ensemble is running, we need to configure the Tomcat so that Solr can direct to it in order to activate SolrCloud.
Configuring Tomcat for SolrCloud
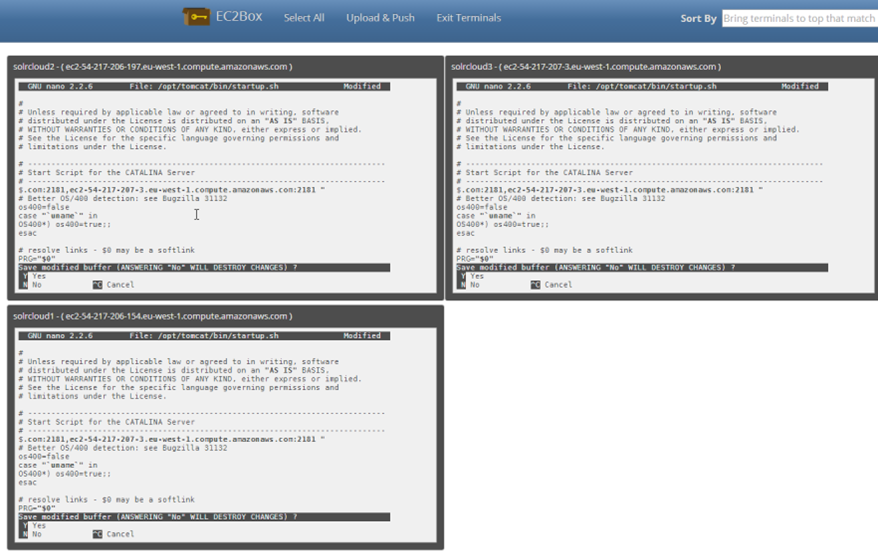
We will now set the paramets to declare the availability of a Zookeeper ensemble at the launch of Solr. For this purpose, we’ll enter this configuration for the start phase of Tomcat, in /opt/tomcat/bin/startup.sh
(note that it is cleaner to put the parameters in a variable named SOLR_OPTS, to be placed in a file /opt/tomcat/bin/setenv.sh)nano /opt/tomcat/bin/startup.shThen add the following line at the beginning of the file:
export CATALINA_OPTS="-Dport=8080 -DzkHost=ec2-54-217-206-154.eu-west-1.compute.amazonaws.com:2181,ec2-54-217-206-197.eu-west-1.compute.amazonaws.com:2181,ec2-54-217-207-3.eu-west-1.compute.amazonaws.com:2181 "
We can now stop and restart Tomcat:
/opt/tomcat/bin/shutdown.shThen:
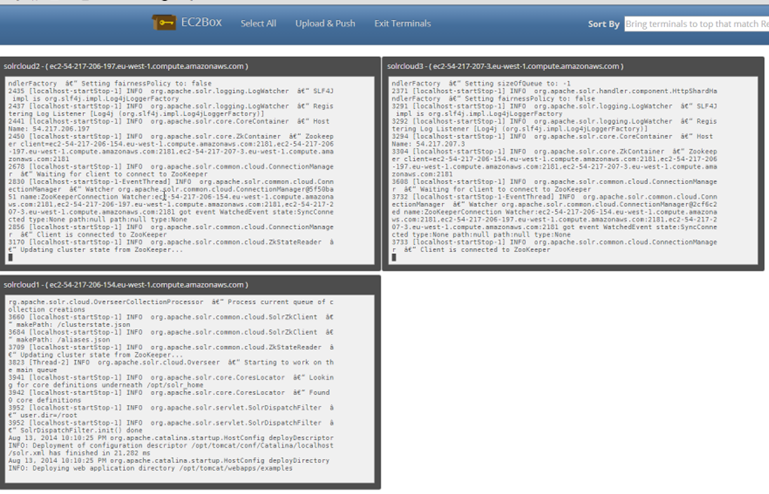
/opt/tomcat/bin/startup.shCheck the logs ot Tomcat and see if everything’s fine:
tail –f /opt/tomcat/logs/catalina.out
It seems to be ok, since the context of Solr has been properly loaded by Tomcat, and the communcation between Solr and Zookeeper is also working.
We can now connect to the web interface from any instance, and we can configure our SolrCloud cluster.Configuring SolrCloud
Connect to the web interface, for instance solrcloud3 :
http://54.217.207.3:8080/solr
We do have now a Cloud tab, which is a good thing.
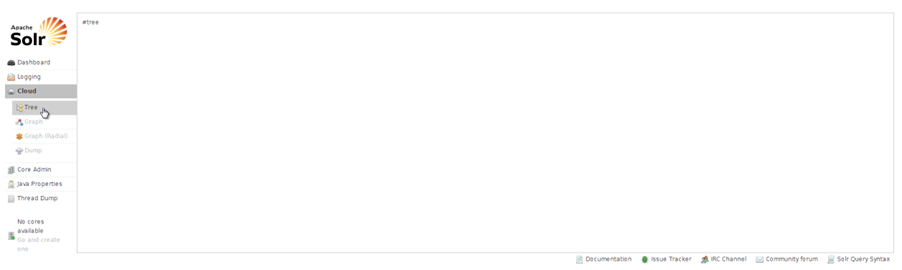
Click on it, then on Tree, and you get… and empty screen. Nothing’s wrong as no collection has been configured yet.
Therefore, we now add a collection that has 3 shards with 2 replicas each, on all 3 instances.
For that, we use the collections API of SolrCloud.
The syntax is as follows:/admin/collections?action=CREATE&name=name&numShards=number&replicationFactor=number&maxShardsPerNode=number&createNodeSet=nodelist&collection.configName=confignameIn order to do that, we need to have a Solr configuration in Zookeeper (parameter collection.configName=configname).
There are several options to do that: you can use the parameter Dbootstrap_confdir when starting the 1st instance of Tomcat, to send your configuration to ZK.
Or you can use the script zkcli.sh that is present in the Solr distro, in example/scripts/cloud-scripts, to upload our Solr config towards ZK. This is our optionBe careful ! From now on, the commands must be targeted to only one instance, and not to the 3 of them simultaneously!
For that, go to /opt/solr_install :
cd /opt/solr_install/example/scripts/cloud-scriptsThen enter:
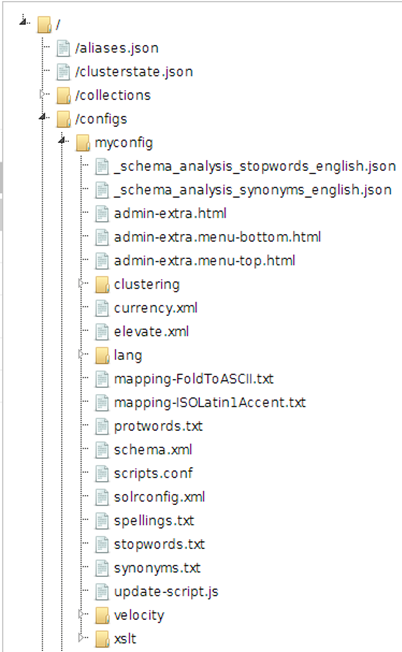
sh zkcli.sh -zkhost ec2-54-217-206-154.eu-west-1.compute.amazonaws.com:2181,ec2-54-217-206-197.eu-west-1.compute.amazonaws.com:2181,ec2-54-217-207-3.eu-west-1.compute.amazonaws.com:2181 -cmd upconfig -confdir /opt/solr_install/example/solr/collection1/conf -confname myconfigzkhost is the ZK ensemble, -cmd upconfig is for the config containing the Solr config to be sent (here we have chosen collection1 provided by default with Solr), and eventually the name used for storing the configuration in ZK.
Hint: the order of these arguments matters in the command
All that remains is for us to connect to the web interface, to check if the configuration does appear in the ZK:
We can now create the collection on all 3 instances. Let’s reuse the command we mentionned earlier, taken from the Collections API:
/admin/collections?action=CREATE&name=name&numShards=number&replicationFactor=number&maxShardsPerNode=number&createNodeSet=nodelist&collection.configName=confignameLet’s adapt this command for our use case:
Some explanation on the parameters:
54.217.207.3:8080 : public IP address of the solrcloud3 instance, but we could also have used solrcloud1 or solrcloud2
name=francelabs : the name of our collection
numShards=3 : the number of shards on which the Solr index will be shared
replicationFactor=3 : each shard is replicated 2 times (indeed, a replication factor of 1 means that the shard is alone)
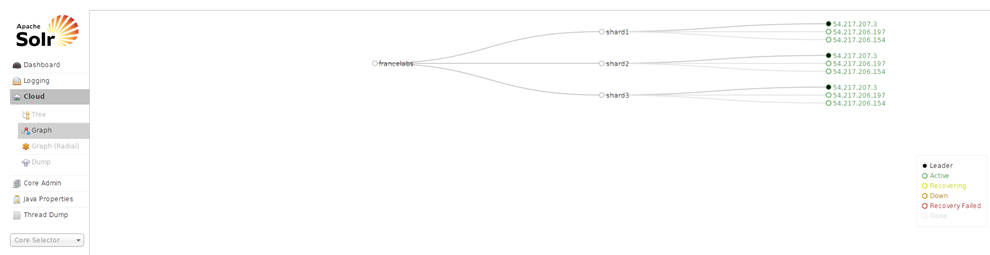
maxShardsPerNode=3 : the max number of shards per instance: we have here 3 shards with a replication factor of 3, thus 3×3 = 9 shards in total. We have 3 machines thus 9 / 3 = 3 shards per node, so we set the maxShardsPerNode to 3.This command will take some time to run. Once finished, check the state of the cloud:
http://54.217.206.154:8080/solr/#/~cloud
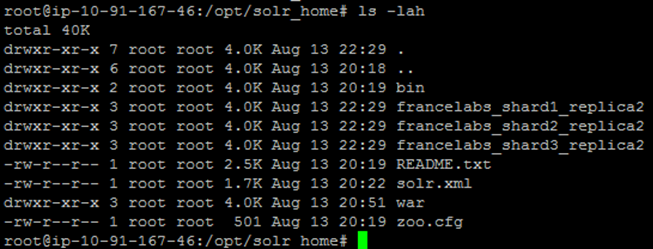
If we check the created files (for that, you can connect to any instance, here we use solrcloud1) :
cd /opt/solr_home
3 folders have been created, each containing one part of the index:
Only the data folder is present, since the Solr configuration is stored in Zookeeper.
That’s it for this tutorial that allows to configure a SolrCloud cluster on Amazon EC2.
In future blog entries – well, if we find the time!, we’ll see how to optimise the resources on the different machines, how to index on this cluster using with or without SolrJ, and how to run queries using SolrJ (load balancing intégré) and without SolrJ through an external load balancer.
VERSION FRANCAISE
Dans ce tutoriel, nous allons installer un cluster SolrCloud sur Amazon EC2.
Nous nous servirons de Solr 4.9, de Tomcat 7 et de Zookeeper 3.4.6 sur des instances Debian 7.
Le tutoriel expliquera pas à pas comment arriver à ce résultat.
Nous allons installer un ensemble de 3 machines avec 3 shards et 2 réplicas par shard, soit un ensemble de 9 shards.
Nous installerons également un ensemble Zookeeper de 3 machines.Cette architecture sera assez flexible pour permettre un fail-over d’une ou deux machines suivant que l’on soit à l’indexation ou au requêtage :

- Indexation : une machine peut tomber sans impacter le cluster (l’ensemble Zookeeper de 3 machines permet d’avoir une machine down). Les updates seront bien diffusées sur les machines up
- Requêtage : on peut perdre 2 machines sans impacter le cluster. En effet chaque machine hébergeant les 3 shards, la recherche pourra être effectuée sans problème avec comme seule contrainte la ralentissement du temps de requêtage.
Voici schématiquement ce que l’on souhaite obtenir :
Pour réaliser cela, nous allons nous servir d’instances Amazon EC2.
Les différentes étapes vont être :
- Configuration des instances EC2
- Installation des briques logicielles
- Configuration du Solr Home
- Configuration du Tomcat
- Configuration de Zookeeper
- Configuration de Tomcat pour SolrCloud
- Configuration de SolrCloud
Configuration des instances EC2:
Dans le cadre de ce tutoriel, les instances choisies sont de type m3 medium avec les caractéristiques suivantes :
Ce qui sera amplement suffisant dans le cadre de ce tutoriel.
Après s’être connecté sur AWS, aller sur la page EC2 puis créer 3 instances de type m3 medium.
Choisir l’image Debian 7 64 bits disponible sur le AWS Store (gratuit) :
Créer ou utiliser une clé de sécurité commune aux 3 instances.
Les 3 instances AWS une fois démarrées nommées respectivement solrcloud1, solrcloud2 et solrcloud3 :
![]() Il faut régler le groupe de sécurité associé aux instances pour que les instances puissent communiquer entre elles et que l’on puisse accéder au Tomcat de l’extérieur.
Il faut régler le groupe de sécurité associé aux instances pour que les instances puissent communiquer entre elles et que l’on puisse accéder au Tomcat de l’extérieur.
Les règles à ajouter sont les suivantes (en plus de la connexion SSH) :
Tomcat : TCP 8080
Zookeeper : TCP 2181, 2888, 3888
Il est conseillé d’associer des « elastic ip » aux instances pour pouvoir y accéder via une ip publique fixe, c’est ce qui a été fait ici.
De plus cela permet d’avoir le même public dns pour que les instances puissent communiquer entre elles.
En effet, sans elastic ip, nous serions obligés d’indiquer les ip privées des instances dans la configuration de Zookeeper (ZK) et celles-ci changent à chaque fois que la machine est stoppée puis démarée. Alors que le public dns permet de faire la résolution de l’ip privée de l’instance.
![]() Une fois les instances prêtes, nous pouvons nous connecter dessus.
Une fois les instances prêtes, nous pouvons nous connecter dessus.
Pour cela, se connecter via Putty sur Windows ou le terminal sur Linux/Mac OS X avec la clé de sécurité associée aux instances.
Dans ce tutoriel nous utiliserons EC2Box qui permet d’envoyer des commandes groupées à plusieurs instances EC2 facilement.
Pour cela, télécharger EC2box sur son github :
Etant sur Windows, la version installée ici est la ec2box-jetty-v-0.15_00
Une fois installé, lancer startEC2Box.bat.
Puis se connecter sur https://localhost:8443/
Les infos de login par défaut sont :
username:admin
password:changeme
Puis aller dans Set AWS Credentials et rentrer l’access key de l’utilisateur AWS.
Puis dans Set EC2 Keys, entrer la private key de la clé de sécurité associée aux instances EC2.
Enfin aller dans Secure Shell -> Composite SSH Terms et choisir les 3 instances solrcloud.
Choisir comme user admin pour pouvoir se connecter.
Pour que les commandes puissent être envoyées en simultané sur les 3 instances il faut cliquer sur chacune des fenêtres ou choisir select all en haut de l’écran.
Pour être en root :
sudo -i
Nos instances ont bien été créées et nous avons pu nous connecter dessus, nous pouvons maintenant commencer le travail !
Installation de Java et des briques logicielles
Nous allons commencer par installer Oracle Java JDK 7 puis nous allons télécharger les dernières versions de Solr, Tomcat et Zookeeper.
Installation de Java
Pour installer Java rapidement, nous allons nous servir d’un repository hosté par webupd8team.
Voici les commandes :
echo "deb http://ppa.launchpad.net/webupd8team/java/ubuntu precise main" | tee -a /etc/apt/sources.list echo "deb-src http://ppa.launchpad.net/webupd8team/java/ubuntu precise main" | tee -a /etc/apt/sources.list apt-key adv --keyserver hkp://keyserver.ubuntu.com:80 --recv-keys EEA14886 apt-get update apt-get install oracle-java7-installerConfirmer l’acceptation des termes de la licence Oracle et attendre que l’installation se termine.
Pour vérifier si java a bien été installé, taper :java –versionEt on obtient bien :
java version "1.7.0_65" Java(TM) SE Runtime Environment (build 1.7.0_65-b17) Java HotSpot(TM) 64-Bit Server VM (build 24.65-b04, mixed mode)Installation des briques logicielles
Créer un répertoire downloads :
Mkdir ~/downloads Cd ~/downloadsTélécharger Tomcat :
wget http://mirror.bbln.org/apache/tomcat/tomcat-7/v7.0.55/bin/apache-tomcat-7.0.55.tar.gzTélécharger Solr :
wget http://wwwftp.ciril.fr/pub/apache/lucene/solr/4.9.0/solr-4.9.0.tgzTélécharger Zookeeper :
wget http://mirrors.ircam.fr/pub/apache/zookeeper/stable/zookeeper-3.4.6.tar.gzPuis décompresser chacune des archives :
Tar xfvz apache-tomcat-7.0.55.tar.gz tar xfvz solr-4.9.0.tgz tar xfvz zookeeper-3.4.6.tar.gzOn déplace ensuite les répertoires dans /opt :
mv apache-tomcat-7.0.55 /opt/tomcat mv solr-4.9.0 /opt/solr_install mv zookeeper-3.4.6 /opt/zookeeper
Java est bien installé ainsi que toutes les briques logicielles dont nous avons besoin pour configurer notre cluster SolrCloud.
Passons maintenant à la partie Configuration !Configuration du Solr Home
Aller dans /opt puis créer un répertoire solr_home :
mkdir /opt/solr_homeNous allons copier à l’intérieur les fichiers de configuration de la collection1
cd /opt cp –r solr_install/example/solr/* solr_home/Cd /opt/solr_homeEditer le fichier solr.xml en remplaçant le host par l’ip publique de chaque instance ec2.
Et remplacer le hostPort par 8080.
Supprimer la collection1 qui ne servira pas puisqu’on enverra à Zookeeper la configuration de Solr à utiliser.
rm –rf collection1Nous allons maintenant copier le war de solr dans notre solr_home :
mkdir /opt/solr_home/war cp /opt/solr_install/dist/solr-*.war /opt/solr_home/war/solr.war mv /opt/solr/war/solr-*.war solr.warNotre solr_home est maintenant configuré.
Passons maintenant à Tomcat.Configuration de Tomcat
cd /optIl faut d’abord configurer le logging avec Log4j pour Tomcat.
cp –r solr_install/example/lib/ext/* tomcat/lib/ cp –r solr_install/example/resources/log4j.properties tomcat/lib/Il faut maintenant configure le contexte Tomcat.
Pour cela nous avons besoin de lancer Tomcat une 1ère fois pour que celui-ci crée les fichiers nécessaires dans /opt/tomcat/conf/Catalina.
Lancer Tomcat :/opt/tomcat/bin/startup.shPuis éteindre Tomcat une dizaine de secondes plus tard :
/opt/tomcat/bin/shutdown.shPuis aller dans : /opt/tomcat/conf/Catalina/localhost et créer le context solr.xml :
cd /opt/tomcat/conf/Catalina/locahost nano solr.xmlEt copier cette configuration à l’intérieur du fichier :
<?xml version="1.0" encoding="utf-8"?> <Context docBase="/opt/solr_home/war/solr.war" crossContext="true"> <Environment name="solr/home" type="java.lang.String" value="/opt/solr_home" override="true"/> </Context>
Tomcat est maintenant configuré. Nous pouvons le lancer pour vérifier que tout marche bien :
/opt/tomcat/bin/startup.shPuis se connecter avec un browser web sur une des ip publiques des instances ec2 par exemple 54.217.206.154 :
http://54.217.206.154:8080/solr
Solr et Tomcat sont bien fonctionnels.
On remarque qu’il y a écrit no cores available ce qui est normal puisque nous n’avons pas de collection de configurée dans notre solr_home.
On remarque également qu’il n’y a pas d’onglet Cloud ce qui est également normal puisque nous n’avons pas lancé Solr en SolrCloud mais en standalone puisqu’à aucun moment dans la configuration nous n’avons parlé de Zookeeper.
Il est temps de s’en occuper !Astuce : si le Solr est inaccessible c’est très certainement dû au security group de l’instance ec2 qui est trop restrictif. Bien vérifier que le port 8080 est bien accessible en TCP.
Configuration de Zookeeper
Aller dans /opt/zookeeper :
Cd /opt/zookeeperNous allons créer la configuration permettant de créer un ensemble ZK de 3 machines.
Créer un répertoire pour permettre à zookeeper de placer ses données :mkdir /opt/zookeeper/tmpEt à l’intérieur de celui-ci créer un fichier myid :
Nano /opt/zookeeper/tmp/myid
Changer la valeur pour chacune des instances :
Pour solrcloud1, entrer 1
Pour solrcloud2, entrer 2
Pour solrcloud3, entrer 3
Passons maintenant à la configuration proprement dite en créant le fichier zoo.cfg dans /opt/zookeeper/conf :
nano /opt/zookeeper/conf/zoo.cfgPuis entrer cette configuration :
tickTime=2000 dataDir=/opt/zookeeper/tmp clientPort=2181 initLimit=5 syncLimit=2 server.1=ec2-54-217-206-154.eu-west-1.compute.amazonaws.com:2888:3888 server.2=ec2-54-217-206-197.eu-west-1.compute.amazonaws.com:2888:3888 server.3=ec2-54-217-207-3.eu-west-1.compute.amazonaws.com:2888:3888
Astuces :
– attention à bien entrer les public dns et non pas les ip publiques sinon les machines ne pourront pas se joindre entre elles.
Vérifier au préalable en essayant de les pinguer entre elles
– attention également au groupe de sécurité des instances. Bien vérifier que les ports nécessaires à la communication des instances sur Zookeeper soient bien ouverts (2181, 2888 et 3888)Lancer ZK :
/opt/zookeeper/bin/zkServer.sh startRegarder les logs de zookeeper pour voir si tout se passe bien :
tail –f /opt/zookeeper/zookeeper.out
On voit qu’ici tout se passe bien puisque le leader a été élu.
Maintenant que notre ensemble Zookeeper est opérationnel, il ne reste plus qu’à configurer Tomcat pour que Solr pointe dessus afin d’activer SolrCloud.
Configuration de Tomcat pour SolrCloud
Nous allons passer les paramètres pour indiquer qu’un ensemble Zookeeper est disponible au lancement de Solr. Pour cela nous allons entrer la configuration au démarrage du Tomcat dans /opt/tomcat/bin/startup.sh
(à noter qu’il est plus propre de placer les paramètres dans une variable SOLR_OPTS à placer dans un fichier /opt/tomcat/bin/setenv.sh)nano /opt/tomcat/bin/startup.shPuis rajouter cette ligne au début du fichier :
export CATALINA_OPTS="-Dport=8080 -DzkHost=ec2-54-217-206-154.eu-west-1.compute.amazonaws.com:2181,ec2-54-217-206-197.eu-west-1.compute.amazonaws.com:2181,ec2-54-217-207-3.eu-west-1.compute.amazonaws.com:2181 "
Nous pouvons maintenant éteindre Tomcat et le relancer :
/opt/tomcat/bin/shutdown.shPuis :
/opt/tomcat/bin/startup.shVérifier les logs de Tomcat pour voir si tout se passe bien :
tail –f /opt/tomcat/logs/catalina.out
Ici tout semble OK puisque le contexte de solr a bien été chargé par Tomcat et la communication entre Solr et Zookeeper est également fonctionnelle.
Nous pouvons maintenant nous connecter à l’interface web par n’importe quelle instance et maintenant configurer notre cluster SolrCloud.Configuration de SolrCloud
Se connecter à l’interface web, par exemple solrcloud3 :
http://54.217.207.3:8080/solr
On a bien un onglet Cloud ce qui est bon signe
Cliquer dessus puis sur Tree et on obtient… un écran vide ce qui est normal puisqu’aucune collection n’a encore été configurée.
Donc ajoutons maintenant une collection qui aura 3 shards avec 2 replicas chacun sur l’ensemble de nos 3 instances.
Pour cela nous allons utiliser la collections API de SolrCloud.
La syntaxe sera de cette forme :/admin/collections?action=CREATE&name=name&numShards=number&replicationFactor=number&maxShardsPerNode=number&createNodeSet=nodelist&collection.configName=confignameMais pour pouvoir faire cela il faut au préalable avoir une configuration de Solr dans Zookeeper (paramètre collection.configName=configname).
Il existe plusieurs moyens de pouvoir faire ça : on aurait pu utiliser le paramètre Dbootstrap_confdir au démarrage de la 1ere instance de Tomcat pour envoyer à ZK notre configuration.
Nous allons putôt utiliser ici le script zkcli.sh qui est présent dans la distribution de solr dans example/scripts/cloud-scripts pour uploader notre config Solr à ZK.Attention ! A partir d’ici les commandes ne sont à entrer que sur une seule instance et non plus sur les trois en simultané !
Pour cela aller dans /opt/solr_install :
cd /opt/solr_install/example/scripts/cloud-scriptsPuis taper :
sh zkcli.sh -zkhost ec2-54-217-206-154.eu-west-1.compute.amazonaws.com:2181,ec2-54-217-206-197.eu-west-1.compute.amazonaws.com:2181,ec2-54-217-207-3.eu-west-1.compute.amazonaws.com:2181 -cmd upconfig -confdir /opt/solr_install/example/solr/collection1/conf -confname myconfigzkhost indique l’ensemble ZK, -cmd upconfig indique le répertoire dans lequel se trouve la configuration Solr à envoyer (ici on a pris la collection1 fournie par défaut avec Solr et enfin le nom sous lequel la configuration va être stockée dans ZK.
Astuce : l’ordre des arguments est important dans la commande
Il ne nous reste plus qu’à nous connecter sur l’interface web pour voir si la configuration apparait bien dans ZK :
Nous pouvons enfin créer la collection sur nos 3 instances, reprenons la commande évoquée précédemment extraite de la collections api :
/admin/collections?action=CREATE&name=name&numShards=number&replicationFactor=number&maxShardsPerNode=number&createNodeSet=nodelist&collection.configName=confignameAdaptons la commande pour notre cas à entrer dans le browser web :
les paramètres expliqués :
54.217.207.3:8080 : ip publique de l’instance solrcloud3, on aurait pu prendre indifféremment celles de solrcloud1 ou solrcloud2
name=francelabs : le nom de notre collection
numShards=3 : le nombre de shards qui vont se partager l’index Solr
replicationFactor=3 : chaque shard est répliqué 2 fois (en effet un replication factor de 1 veut dire que le shard est tout seul)
maxShardsPerNode : le nombre maximum de shards par instance : ici on a 3 shards avec un replication factor de 3 soit 3×3 = 9 shards au total. On a 3 machines donc 9 / 3 = 3 shards par node, on règle donc le maxShardsPerNode à 3.La commande va mettre un peu de temps à s’exécuter. Une fois celle-ci terminée, vérifier l’état du cloud :
http://54.217.206.154:8080/solr/#/~cloud
Et si on regarde du côté des fichiers créés (se connecter sur n’importe quelle instance, ici sur solrcloud1) :
cd /opt/solr_home
On a 3 répertoires qui ont été créés chacun contenant une partie de l’index :
Seul le dossier data est présent car la configuration de Solr est stockée dans Zookeeper.
C’est la fin de ce tutorial permettant de configurer un cluster SolrCloud sur Amazon EC2.
Dans d’autres billets – si nous avons le temps!, nous verrons comment optimiser les ressources des différentes machines, indexer sur ce cluster avec SolrJ et sans SolrJ ainsi qu’effectuer des requêtes avec SolrJ (load balancing intégré) ou sans SolrJ avec un load balancer externe.